Wednesday 29 May 2013

Happy Birthday - Fresh Brewed Blog

Hee hee hee hee, I have a cheek to publish this one, but I thought I would try anyway. lol I am going to enter this little card into Fresh Brewed Designs - 24 hour Caffeine Crazy Challenge* May It is a Happy Birthday card and I will say that my colouring in really isn't anything to write home about. I am going to have to get more practice in this, but I would rather be making the cards that I do. I really don't like showing of my colouring in as it looks like a child's. lol Maybe I could just say that it was a small child that I know that coloured it in for me. Do you think I would get away with that? Maybe not now, especially after telling you what I was thinking about. Oh well, I'm too honest for my own good. Anyway, here goes my little card. The background paper is not showing up in the picture, it is a lovely rainbow coloured background which goes from light to dark at the bottom and I thought that it would at least give it a lovely background to the image. Sorry that it is not showing this up, I have tried taking the picture quite a few times, but it is not showing up the paper. I know this isn't very good, in fact it is very bad, but I tried my best and that is all that I can do. lol


Tuesday 28 May 2013

Wedding Anniversary box

I just have a little update to tell you about, I have made a Special Card Box for the Wedding Anniversary card that I made, the yellow card. I felt that as it wouldn't have fitted into an ordinary sized envelope then it had to have something a bit more special to go inside. You will be able to see the envelope in the post dated Friday 17th May 2013 which you can find by clicking HERE, I had been going to put it into a separate post, but felt that it should be in beside the card where it should be. I hope that you all had a wonderful weekend if you had a holiday then it would have been a holiday weekend so a bit longer for those of you who were working as well. Hopefully your weather was nice and you were able to top up your tan. Unfortunately, for us here in Renfrew we weren't as lucky to have sunshine and smiles. I say that as I have noticed that when the sun comes out, everyone smiles, but when it is raining people are glum and don't look up. Human nature I suppose, it is just something that I have noticed over the years, have you noticed this?


Sunday 26 May 2013

Happy 4th Birthday Allsorts

 
I would like to post this card to wish Allsorts a Happy 4th Birthday. This card was created by making up 3 boxes, large, medium, small. Once the boxes were made up I put on various embellishments, from my stash. I used red crystals, white pearls across the top box, roses round the side, I put flowers, hearts and cakes round the sides of the boxes and to finish off the cake I put clear crystals and 2 pink butterflies. I made a base for the cake to sit on, then I made a box to cover the cake. I put acetate inside each of the spaces in the box so that you can see the cake, to top of the box I put on a lid.

Happy 4th Birthday Allsorts.


Saturday 25 May 2013

For You

Good morning everyone, it is a beautiful sunny day here in Renfrew, Scotland. It is about time that we saw some sunshine as all it has been is constant rain every single day. I hope this keeps up for a while anyway. I am going to enter this card into the Allsorts Challenge - Anything Goes I have just finished another card, well I finished it the other day, but due to a dose of sleepy sickness was unable to post this card.


I have added a few more words which were die-cut again with Tattered Lace dies. The words were On Your Wedding Day. I am going to enter this card into Paper a la Mode May 25 - 31 ANYTHING GOES - The Outlawz Challenges. So here we go: I pierced the outside of the main card, this is the first time that I have done this correctly. I didn't know that there was a ruler that you could use in order to do this. Once I found out, I bought the Tim Holtz Idea-ology Design Ruler 12inch I used to wonder how people got the edges so straight and now I know. Anyway, back onto the card. I then cut a piece of card 13cm x 20cm to do all the workings of the card onto. I embossed the card with an embossing folder (unsure of the name), die-cut a Spellbinders Floral Oval - the largest size, I then die-cut Spellbinders Medallion One and I took the smallest die from Spellbinders Resplendent Rectangles I used foam pads to stick on the Floral Oval, the Medallion One and the small label from the Resplendent Rectangles. I then die-cut the words For You which are from Tattered Lace Interlocking Dies Once all this was completed, I then put a piece of Guipure Lace purchased from Wild Orchid Crafts I then decorated the card with gems from my stash and a couple of swirls to finish the card off. I do hope that you like my card, thanks for stopping by.

Tuesday 21 May 2013

Bit By the Bug Tuesday: Bobby's Bo Bo

It is Bit by the Bug Tuesday!  Every Tuesday, my good friend Naomi over at Creative Bug on the Loose, offers up one of her digital images as a freebie.  This week I offered to make a card to showcase her cute little image, 'Bobby's Bo-Bo'.

Here is a picture of what this week's freebie looks like...

Here is the card I made...


Isn't he just so cute?  You just want to wrap him in your arms and make all his hurts go away.

In order to take advantage of this week's free digi stamp, 'Bobby's Bo-Bo', head over to Creative Bug on the Loose and follow the instructions on how to grab it. While you are over there, don't forget to check out all the great digis Naomi has available in the store for purchase. If you have the chance, please leave her a little love too. Her health isn't the best right now so she could definitely use some encouragement.


I've caught the bug,
have you?


Friday 17 May 2013

Wedding Anniversary

Good morning everyone, at last Scotland has sunshine. I can't believe it is actually here, it is so lovely seeing such beautiful weather for a change, I was beginning to forget what it looked like. So I think today is going to be spent sitting out on my decking doing a bit of crafting, it will be so nice to actually sit out in the sun and enjoy a beautiful day. I am also going to enter this card into the Allsorts Challenge - Anything Goes Anyway, I have just completed a Wedding Anniversary card for a friend who asked me to make her one for her friends. I intend to enter this into the Simon Says Stamp Challenge - Flower Power. I am also going to enter this card into the challenge over at The Outlawz Challenges - Paper a la Mode -May 18 - 24: Anything Goes.


 I created this card based on a card that I saw over at Card-Making-Magic.com - Acetate Front Card Tutorial I have made another card like this one, but I was pleased with the way this one turned out as I got the acetate properly fitted on this one, so it didn't bend the way the other one did. I started this card with a 20cm x 13.5cm card, which I then embossed using the Craftwell eBossing Folder, once this was done, I then punched the bottom of a card using a Martha Stewart punch. I then created a flower corsage made up with flowers from Wild OrchidCrafts I used Handmade Mulberry Paper Stem Flowers and another flower from my stash (sorry I don't know where I got this one from) It is a hanging flower with many small blooms attached along the stem. They were all initially pink flowers and I coloured them with yellow Promarkers which then turned them a lovely shade of peach. I then used Decorative Pins and Decorative Crown Pins both from Wild Orchard Crafts. I put in a couple of crystal stems - again from Wild Orchid Crafts (which are no longer available). Once the flowers were finished I then put on a pearl swirl coming from the flowers. I then die-cut the words "Congratulations On Your Wedding Anniversary", I sprinkled very fine white glitter over the words and to finish off the main part of the card, I used Liquid Pearls - Silver Pearl round the outside of the card. I then created the main card to put the embellished card onto, before attaching the embellished card to the main card, I attached my acetate to cover the card completely. Before I stuck down the acetate, I attached a piece of ribbon round the bottom of the acetate, sticking it behind the acetate. I then created a ribbon and put a peach net butterfly on top to finish off the ribbon. I decided to make an addition to the card by making a special card box in which to put the card in, as a normal sized envelope wouldn't have worked. So I made this following the instructions over on Card-Making-Magic.com The instructions were very easy to follow and I only made a couple of changes to the card by adding additional card to the sides and the bottom of the box in order to facilitate the size of the acetate. I also put in an oval shape in the centre and covered the outside of the oval with some flowers to make it co-ordinate with the card. It worked out quite well, and you will be able to see that the box follows the same type of pattern as the card.


I do hope that you like my card. 

Thanks for stopping by.

Wednesday 15 May 2013

Feel Better Soon Stamps - My Craft Spot

Hi everyone, I played along in the My Craft Spot Spring Stamp Release Party Blog Hop and I won one of the Stamp Sets. It was called "Feel Better Soon" and can be purchased from My Craft Spot. The stamps were very kindly posted out to me by Kate at Small Bits of Paper I have taken a couple of pics of these stamps and I am looking forward to using them, although I don't want a lot of people taking ill just because I have new stamps. lol


Sunday 12 May 2013

Celebrate

Hi everyone, this was a very quick card made with the eBosser, embossing folder "Magic Celebration". I then ran the embossing folder through the eBosser, and then put Ultramarine Blue Tint - PanPastels across the swirls and the word 'celebrate'. I then attached a few clear gems and a silver butterfly on the left hand side of the gatefold card. On the right hand side of the card I attached a blue ribbon and a blue wire embellishment.


Saturday 4 May 2013

Birthday Card for Sandra

Hi, This is the second (similar) card that I made for my friend Sandra for her birthday. I am going to enter this card into the Allsorts Challenge - Anything Goes. I am entering this card into the Forever Friends: Monthly Challenge - Anything Goes. I am also going to enter this card into the Simon Says Stamp Challenge - Flower Power. The only differences between this one and the last one is that there are more flowers on the card and I also attached 3 decorative hat pins into the flowers. The sentiments were also changed to To a Special Friend and Happy Birthday.


Close up image of flowers


  Close up image of ribbon


For Naomi

Hi everyone, I have just finished a couple of cards (both very similar though), the first one was for Naomi over at Creative Bug on the Loose She hasn't been too well of late and Lisa over at Decosse's Dynamite Doodles came up with the idea for all Naomi's friends to make her a get well card. I was more than happy to do this for Naomi, as she has been a great help with me designing and making my new blog and helping me out with various questions that I had for her regarding blogging. I am still in the learning process of this blogging 'lark', but I am getting there slowly but surely. Maybe one day, I will know what I need to know and stop asking loads of questions from different people. I would like to say thanks to Naomi, Lisa and Deb over at A Look Through My Eyes every one of these wonderful girls have given me so much help over quite a while and I am still asking them questions. I hope they will remain to stay with me, just in case I have other questions. lol Once again, thanks girls for all of your help, I couldn't have done it without any of you. Jen xxx


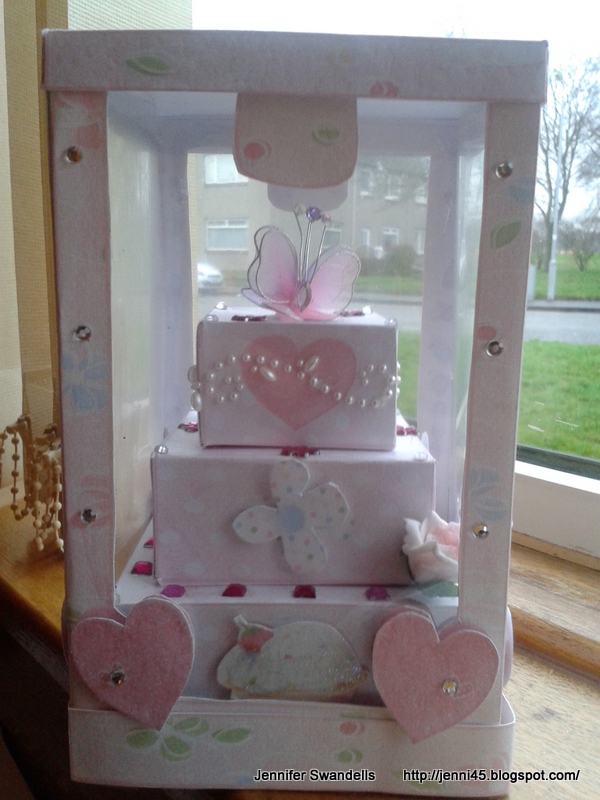
  This is the card that I did for Naomi. I tried out a different technique for this card which I saw over at Card Making Magic, this is a great site and is run by and looked after by Christina at Flowers, Ribbons and Pearls. I have learned so much from this website in the time that I have been 'visiting' lol. The cards that Christina makes are truly wonderful and she is such a great teacher, very patient and takes her time when explaining how to do things. This card was started off with one A4 sheet of paper, halved in two then cut in half. I then created another long piece of paper to fit across the top of the halved A4 paper (about 2 inches in size)this was to create a hinge to put at the top of both sides of the card. Before I attached both sides of the card together, I die cut one side with the trellis die and then attached both sides together with the little hinge piece of paper. Inside the card I covered over the hinge paper with another piece of card, so you wouldn't be able to see the workings of the card. On the outside of the card, I then positioned some flowers at the bottom left hand side, some coloured with blue Promarkers. I attached a ribbon across the top of the card and then tied a ribbon to put on the right hand side, the ribbon had a gem placed over the top, there was a crystal swirl put underneath the ribbon. I then added 2 silver stickers which said A Special Friend and Feel Better.

Thursday 2 May 2013

Acetate Bow Fronted Card

Good morning everyone, I hope that you have all had a wonderful week so far, time is flying by and I can't believe that we are in May already. I am going to enter this card into Crafting by Designs and also Forever Friends: Monthly Challenge - Anything Goes I am also going to enter this card into Simon Says Stamp Challenge - Flower Power. Our Mother's Day was in March, so this card was already made for this day. I do hope that you like it.