OVER THE NEXT COUPLE OF WEEKS MY BLOG WILL BE UNDERGOING SOME NEW CHANGES, SO PLEASE BEAR WITH ME AND DON'T LEAVE ME, JUST KEEP COMING BACK TO SEE WHAT THE NEW CHANGES ARE AND SOON I WILL HAVE A NEW BLOG LAYOUT

Wednesday, 16 October 2013
Sunday, 13 October 2013
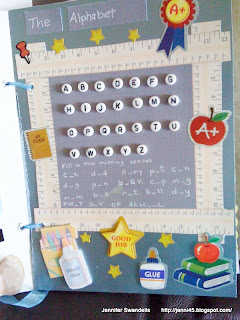
What a Star!!!
I am entering this card into the Allsorts challenge 'USE YOUR ABC's', projects of all kind with some sort of use of the Alphabet but avoiding including letters in a sentiment. This is only part of the project as it was a book that I had done for this.


.png)


I have used plenty of letters in the first part of this booklet and there are loads of letters and numbers used throughout the booklet.
Saturday, 12 October 2013
More Christmas cards
Hi everyone, here are a few more Christmas cards that I have made this afternoon.


.png)


All of these cards were made in exactly the same way. Each of the cards were matted and layered with silver mirror card and then the white sheet of card was embossed with a folder. I followed the tutorial from Christina Griffiths - www.card-making-magic blog.I then cut out the shapes (freehand) from glitter paper and stuck them to the card using sticky fixers. I used sentiments that I had in my stash to match the colour of the main images. I stuck a few glitter domes at each corner and on some of them I put flourishes and angels wings from diamantes.
Thursday, 10 October 2013


First Christmas card
First Christmas card, this is the first card that I have made this year as I have totally lost my 'mojo', I don't know where it has gone but it is no longer with me. lol
I will be trying my hardest to find it though. I hope that you will forgive me for this being my first Christmas card of the year.

.png)
I will be trying my hardest to find it though. I hope that you will forgive me for this being my first Christmas card of the year.

The picture hasn't really taken all that well and I must admit to the card looking much better in real life. The baubles look mis-shapen although they really don't look like this in real life. lol Not an excuse.
I didn't use any Spellbinders on this card and I took the tutorial from Chritina Griffith's - Flowers, Ribbons and Pearls website. This is the link to the actual tutorial that I used. So go on and have a bash at it and hopefully your baubles won't look as mis-shapen as mine. lol
Tuesday, 8 October 2013
Top Three
WOOHOO, I've got another Winner over at Craft my Life for my bezel. Nice to get this one too. Just thought I would let you all know.
.jpg)

.png)
.jpg)

Monday, 7 October 2013
16th Birthday
I was asked to make a very floral, girly, card for a 16 year old. Her mum had a lot of input into what she was wanting on the card, so this card was basically made to exactly as asked for.


.png)

I used the Venetian Accents border die and cut it out twice, I then stuck these two border pieces onto the card and plaited ribbon through. I then stuck a pink bow and put a pink dazzler and two stick pins to finish off the card. I put Dannah's name down the right hand side of the card,
using diamantes to spell out her name.

I cut out the number 16 and stuck this down with foam stickers on top of pink Happy Birthday paper. I used a 16th Birthday badge created by Annette of Netty's Cards. The other side of the page was a decoupaged Fairy Wishes which I got from Craftsuprint CUP345452-1483
I sprinkled some Glamour Dust over the Fairy and the rose and the butterfly (which was not part of the Fairy Wishes decoupage)

Box for card - I attached a couple of little charms at the top of the roses


I hope you like my girly card.
Sunday, 6 October 2013
Celebration of World Card Making Day
I am sorry everyone, I have been MIA for quite a while now. I haven't been very well and haven't been blogging or even making cards.
I am doing this post to support one of my friends, Lisa, over at Decosse's Dynamite Doodles who has decided to celebrate World Card Making Day 5th October 2013, in order for her to make it a celebration she is giving away some great FREEBIES in the shape of words that can be used for celebration.
As Lisa says in her post:
"How is that for a start?! Now I do have a little something extra planned, but this time you need to do some work yourself. Since this celebration is all about our cards, I thought it would be nice to see one of your favourite cards that you created and posted about, from the last year. I was going to ask you to share your favourite, but when I thought about it, I could never come up with an absolute favourite myself. I have a range of cards that are my favourite and I am guessing that you do as well. So, start scrolling through your old posts and find a card that you really, really like. Come over here and link it up BUT you also have to leave me a comment on this post telling me WHY it is one of your favourites. That isn't too difficult now is it? Check out what you have a chance to win..."
So why not pop over to Lisa's blog and see what she has on offer and don't forget to put in your favourite cards that you have made from last year. You never know what you could win.
Here are some of my favourite cards that I made during the year


.png)
sS
I am doing this post to support one of my friends, Lisa, over at Decosse's Dynamite Doodles who has decided to celebrate World Card Making Day 5th October 2013, in order for her to make it a celebration she is giving away some great FREEBIES in the shape of words that can be used for celebration.
As Lisa says in her post:
"How is that for a start?! Now I do have a little something extra planned, but this time you need to do some work yourself. Since this celebration is all about our cards, I thought it would be nice to see one of your favourite cards that you created and posted about, from the last year. I was going to ask you to share your favourite, but when I thought about it, I could never come up with an absolute favourite myself. I have a range of cards that are my favourite and I am guessing that you do as well. So, start scrolling through your old posts and find a card that you really, really like. Come over here and link it up BUT you also have to leave me a comment on this post telling me WHY it is one of your favourites. That isn't too difficult now is it? Check out what you have a chance to win..."
So why not pop over to Lisa's blog and see what she has on offer and don't forget to put in your favourite cards that you have made from last year. You never know what you could win.
Here are some of my favourite cards that I made during the year

The very very first card that I ever made.

I just loved this card as it was the first Frantage card that I have done and I really liked how it turned out, I love the sentiment as well as there is nothing more true than,
'Good friends are hard to find, harder to leave, And impossible to forget'
I have found a lot of good friends through blogging and this saying for me says it all.


Although not exactly my best card that I have done, I enjoyed making this 'Penny Slider' card. It was so much fun to make and when I decided to have a little dinosaur popping out of one egg and the two boys popping out of the other one,
this made the card perfect and the boys definately liked it.

My very first card made using Pan Pastels where I fell in love with what this medium could do.

This was the first card that I had ever used acetate on and I was extremely happy how it turned out. I used the acetate and bevelled it across the front so that all the flowers wouldn't be moved or spoiled.

I have tried out 4-page cards before, but I was really pleased with how this one turned out.


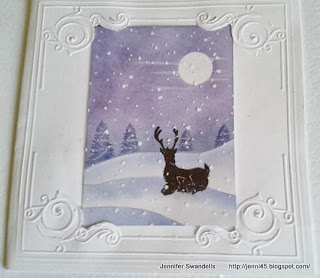
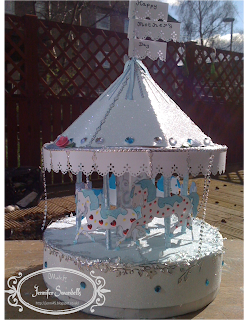
Although not a card, it was presented as a card and a present. The bottom of the Carousel could come out and the present (above) was hidden inside the Carousel.


This was when I started using my Spellbinders more often, I am trying to use them in more of my cards. Sometimes I find it difficult how to place them, but I am finding ways of using them better.
I hope that you like my little 'montage' of favourite makes over the year, although I have much more that I enjoyed making I could probably go on forever.
sS
Subscribe to:
Posts (Atom)