Thursday, 31 October 2013

Time for a Trick or Treat Treasure Hunt!!!

It is time for a...
Hello and welcome to the first ever Trick or Treat Treasure Hunt brought to you by the team of Creative Bug Digitals.

This is stop # 4. It is 12:00 pm EDT which is 4:00 p.m. here in Scotland, and it is time to release the fourth clue.

If you missed the first three stops, please go HERE (http://scrapbookingforbeginners-naomi.blogspot.com/2013/10/time-for-trick-or-treat-treasure-hunt.html in case the link doesn't work) and start from the beginning to ensure that you understand how to play along and get all the clues you will need to participate.

Clue #4

  1. Go the Creative Bug Digitals Store at http://www.creativebugdigis.com.
  2. Find the Halloween section.
  3. Click on the first image across in the second row down. This will bring the image name up for you.
  4. What is the first letter in this image's name? Take that letter and write it down. This is your fourth of six letters.
__?___     __?___         __?___      __?___       _____      _____

You now have four of your blanks filled in.  Remember you will need to unscramble the word when you have finished collecting the two remaining letters.

To help you find the correct image in the store, I have created a project to showcase it...


Here he is getting himself all ready for his Halloween party, getting his togs all sewn up and ready to go.  Really the only thing that I used to 'colour' this little ghost was Red promarkers, for the heart and black promarkers for everything else.  I cut out the eyes, mouth and arms and used 'fluffy stuff' (honestly this is what it is called)  to cover the ghost with, this 'stuff' puffs up and gives a shine to it.  Once the 'fluffy stuff' was nearly dried, I stuck on the eyes, mouth and arms. 

Stay tuned for the release of clue #5...

At 2:00 pm, EDT, the fifth clue will be released over on Suze's Blog, Craftysuze, (here is the address in case the link doesn't work-- http://craftysuze.blogspot.co.nz/)

If you happen to get lost along the way you can find the complete line up below. Times are listed in EDT...

The Treasure Hunt starts over at Creative Bug on the Loose at 8:00 am

Go to Vicky's Blog, Crafting Vicky, at 8:00 am for clue #2

Go to Lisa 's Blog, Décosse's Dynamite Doodles, at 10:00 am for clue #3

Go to Jen's Blog, Krafty Keepsakes, at 12:00 pm for clue #4

Go to Suze's Blog, Craftysuze, at 2:00 pm for clue #5

Head back to Creative Bug on the Loose, at 4: 00 pm for clue #6--the final clue.

Now don't worry, if you aren't around for the day, that is okay too. You will have until Midnight on Friday to complete the treasure hunt. We want to make sure that all of our readers have the chance to participate. You'll find all the details you need, including a list of prizes, over at Creative Bug on the Loose.


We look forward to seeing you participate!!!


HAPPY HUNTING!!!


FREE CRAFT DOWNLOADS

Hi everyone, this is the time of year when everyone is looking for Calendars, New Year Papers and New Year Templates.  Where could be the best place to go for this sort of thing and best of all it's FREE.  You heard me right, it is totally free.

Free Craft Downloads is one place that you should stop over and have a look at, as it has all you are looking for and more.


This is only a sample of the papers that are available to everyone, they have all different sizes on offer and loads of different colours and sizes of fonts, that you could use on your cards, scrapbooks etc.  
Here is the link that will take you to the New Year Papers 1
This is the link that will take you to New Year Papers 2


Again, this is only a sample of what is available with calendars.  They have A4 Calendars - Month to a Page; A5 Calendar Sheets; 6 month Calendars and Full Year Calendars.
Here is the link that will take you to single month Calendars
Here is the link that will take you to A5 Calendar Sheets
Here is the link that will take you to 6 month Calendars
Here is the link that will take you to the Full Year Calendar


Here is the link that will take you to all of the templates


There is a variety of different templates on offer for you to use on your creations.


Saturday, 26 October 2013

Book card

I went to the SECC Christmas Craft Fair yesterday with my friend Dawn and it was like two children discovering Christmas, we really had a great time looking at everything that was there and having a good old 'chinwag'.   Our best time was when we were actually spending money to buy what we wanted to.
I got quite a few things and now that I have left the fair, I have remembered loads of other things that I wanted to get, oh well, there is always next year or the local craft shop!!

Anyway, onto my purchases which were a Spellbinders Labels Four die, I really wanted this die as there is a card on Christina Griffiths' blog - card-making-magic.com  which I wanted to make, so I was so pleased to have been able to get it.  I also bought a Card Stand die, so that I would be able to make my card stand up properly.

Here is the link for the actual card, you have to have Spellbinders Label Four in order to make this card.


As this was the first time that I tried this card out, I thought I would just go with white to see how it turned out.  I must admit, I was rather pleased with myself.


I created a small corsage for this side of the card and introduced a bit of colour with the pink tulips and roses.   I sprinkled the flowers with glamour dust just to give them a bit of sparkle. Christina sells corsages on her own site, however, you could try making your own as I did.  Not perfect but passable for my first try at doing a corsage.


Embossed sentiment 'Best Time of the Year', due to the flash and angle that I was trying to take the picture at, it didn't come out exactly as I would have hoped.  I used a silver plated butterfly and put a swirl at the bottom of the butterfly.  The butterfly is actually silver looking but it just didn't come out as well when photographed.


Down the centre of the card I used white seam binding and over the top I used a beautiful embellished ribbon of pearls, I also put a small piece of ribbon on top and a silver dazzler to finish off.

I do hope that you like my card.


Mum and Dad's Anniversary

Hi everyone, I haven't been about much and not been making many cards, which is why I haven't been online.  Anyway, it was my Mum and Dad's Wedding Anniversary a few days ago and I made them a framed card, which was taken from a tutorial on Christina Griffiths' blog - card-magic-magic.com
I go to Christina's site on a regular basis, either to learn something new or just to remind myself how to do certain things.  She is adding newer cards to her blog on a regular basis, so if you haven't had a look, why not pop over and see what she has to offer in the way of card-making.  I have found it to be an invaluable source of inspiration and ideas and it is generally my first pit-stop before I start making my cards, especially at the moment when I have lost my 'mojo'.

So onto the card that I made for my Mum and Dad.


If you follow the tutorial on Christina's blog, you will get the same or similar type of card.  I put silver ribbon with flecks of silver on the top left hand and the bottom right hand corner of the card.  This picture also shows the envelobox that I used for the card.  There are roses and carnations used on the card and to put a little colour on the card I used yellow roses as my Mum loves them.  I sprinkled the flowers with some glamour dust to give them a bit of sparkle.

Yellow is most well-known as a symbol of friendship, however, they can also represent joy, new beginnings, intellectual energy, happiness and lightheartedness.


This is a segment of the envelobox that I made for the card and I put a little corsage with yellow and white roses.


Another segment of the envelobox showing the beautiful butterfly ribbon which I got from Wild Orchid Crafts.

I hope that you like the card I made for my Mum and Dad, I know that they loved it which is the best that I could have asked for.


Tuesday, 22 October 2013

Bit by the Bug Tuesday - Petrified Pumpkin


It is time for another Bit By the Bug Tuesday. The day where I introduce you all to the newest freebies over at Creative Bug on the Loose. This week we have,

Petrified Pumpkin


Here is my card ...........


I fussy cut the image and coloured it with my promarkers, I used coloured glitter on parts of the pumpkin, leaves, stalk, eyes.  I put the image on a black background so as to make the image stand out.  I also used the 'October' sentiment which was given to me by 

This pumpkin certainly looks petrified whatever it has seen, who knows what it could be as Halloween is just around the corner!!


So, what are you waiting for? 
To take advantage of this Halloween image, head on over to 
Creative Bug on the Loose and follow the instructions on how to bring this 
Petrified Pumpkin home with you. 

While you are over there, don't forget to check out all the great digis Naomi has available in the store for purchase and don't forget to leave her a little love too.


I've caught the Bug, have you?


Monday, 21 October 2013

Silver Bauble Card


Silver Bauble Card

I took inspiration from a tutorial over at Christina Griffith's blog card-making-magic.com - Bauble Card

I followed the majority of this tutorial although I did do a couple of things differently. I matted and layered the card with red and white card, embossed the white card with Creative Expressions A4 Embossing Folder - Heart Lattice, I then put a crystal swirl on the left hand side of the card.
I then cut out a full bauble shape and a bauble shape with the inside cut out.  I then used strips of paper to put across the bauble in order to mimic diamonds on the inside.  Then I used different colours of glitter in each of the separate sections.  On the outside of the bauble I used Flitter Glue and Silver Mega Flakes to colour the outside of the bauble silver.
I then used a Merry Christmas sticker to put at the bottom left hand side of the card.


Wednesday, 16 October 2013

UNDER CONSTRUCTION

OVER THE NEXT COUPLE OF WEEKS MY BLOG WILL BE UNDERGOING SOME NEW CHANGES, SO PLEASE BEAR WITH ME AND DON'T LEAVE ME, JUST KEEP COMING BACK TO SEE WHAT THE NEW CHANGES ARE AND SOON I WILL HAVE  A NEW BLOG LAYOUT

Sunday, 13 October 2013

What a Star!!!

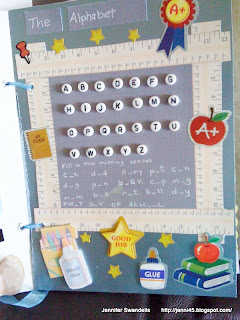
I am entering this card into the Allsorts challenge 'USE YOUR ABC's', projects of all kind with some sort of use of the Alphabet but avoiding including letters in a sentiment.  This is only part of the project as it was a book that I had done for this.


I have used plenty of letters in the first part of this booklet and there are loads of letters and numbers used throughout the booklet.


Saturday, 12 October 2013

More Christmas cards

Hi everyone, here are a few more Christmas cards that I have made this afternoon.


All of these cards were made in exactly the same way.  Each of the cards were matted and layered with silver mirror card and then the white sheet of card was embossed with a folder.  I followed the tutorial from Christina Griffiths - www.card-making-magic blog.I then cut out the shapes (freehand)  from glitter paper and stuck them to the card using sticky fixers.  I used sentiments that I had in my stash to match the colour of the main images.  I stuck a few glitter domes at each corner and on some of them I put flourishes and angels wings from diamantes.


Thursday, 10 October 2013

Christmas cards

Here is another Christmas card that I made today.


First Christmas card

First Christmas card, this is the first card that I have made this year as I have totally lost my 'mojo', I don't know where it has gone but it is no longer with me. lol
I will be trying my hardest to find it though.  I hope that you will forgive me for this being my first Christmas card of the year.


The picture hasn't really taken all that well and I must admit to the card looking much better in real life.  The baubles look mis-shapen although they really don't look like this in real life. lol  Not an excuse.

I didn't use any Spellbinders on this card and I took the tutorial from Chritina Griffith's - Flowers, Ribbons and Pearls website.  This is the link to the actual tutorial that I used.  So go on and have a bash at it and hopefully your baubles won't look as mis-shapen as mine. lol


Tuesday, 8 October 2013

Top Three

WOOHOO, I've got another Winner over at Craft my Life for my bezel.  Nice to get this one too.  Just thought I would let you all know.


Monday, 7 October 2013

16th Birthday

I was asked to make a very floral, girly, card for a 16 year old.  Her mum had a lot of input into what she was wanting on the card, so this card was basically made to exactly as asked for.  


I used the Venetian Accents border die and cut it out twice, I then stuck these two border pieces onto the card and plaited ribbon through.  I then stuck a pink bow and put a pink dazzler and two stick pins to finish off the card.  I put Dannah's name down the right hand side of the card,
 using diamantes to spell out her name.


I cut out the number 16 and stuck this down with foam stickers on top of pink Happy Birthday paper.  I used a 16th Birthday badge created by Annette of Netty's Cards.  The other side of the page was a decoupaged Fairy Wishes which I got from Craftsuprint CUP345452-1483
I sprinkled some Glamour Dust over the Fairy and the rose and the butterfly (which was not part of the Fairy Wishes decoupage)


Box for card - I attached a couple of little charms at the top of the roses


I hope you like my girly card.